S-Wheat Farm Chick Antique/Vintage Finds
If you love the Shabby Chic furniture or unique pieces, then you are at the right place! Here are just a few of the pieces I've redone and can give you ideas to inspire you to repurpose items.
 |
| Me & Co-junker/partner/daughter, Jen |
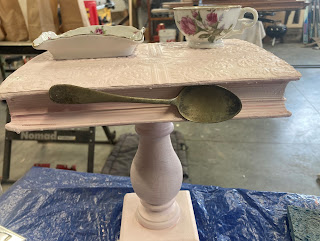
Unique Jewelry Organizer - Items used, a book, a candle holder, vintage items such as an old tea cup, saucer, spoon, small dish... let your imagination go! First I glued with liquid nails the book to the candle holder - then primed, then painted. After the paint was dried, I glued the cup, saucer, spoon and just decorated it up a bit per the pictures. Enjoy!

Look what you can do with ugly furniture
~~~
Other items refinished with my homemade Annie Sloan Chalk Paint
Girly Up Project #1.... painting a chandelier. I used Annie Sloan chalk paint in old white. No priming needed, just painted it, and applied her "dark wax" to highlight some of the chandelier features.

 ~~~~~~~~~~~~~~~~~~~~~~~~~~~~~~~~~~~~~~~~~~~~
Girly Up House project #2.... painting my kitchen island with Annie Sloan chalk paint in ebony.


I made 2 different colors, black and aqua. So first I painted the dresser black using 2 coats of paint, as shown below...

First I painted it yellow (3 coats) , then painted a 2 coats of blue over the yellow, then with 000 steel wool, I rubbed through the blue and brought some yellow out for a distressed look. Next I put a clear wax (used the good Annie Sloan wax) then put a dark wax (Annie Sloan dark wax) over the clear and this is the result: A fresh new look. =)

 |
| Before - An ugly cabinet can go from this.... |
 |
| After- to this, all with a few coats of paint Here is what I did, fill any holes with wood putty (take off the hardware too), then I rolled 2 coats of gray home-made paint with one coat of white paint over the gray. I used a medium grade sanding sponge (or you can use steel wool) to bring the gray out. Then I put a clear Annie Sloan paint wax over it and a cool finished product. This took an afternoon of work - approx 4-5 hours. |
DIY Chalk Paint Project
When I started to “girly-up my farm-house” I found a
wonderful new paint that goes over almost anything, metal or wood – no priming
and great results are achieved. It’s Annie Sloan Chalk Paint. This is a wonderful product except it’s quite
expensive, about $38 per quart. Because
I paint treasures to sell at my farm chick show, I make my own chalk paint, but
I do like the official Annie Sloan
finishing wax. (Can be found locally in
Colfax, WA at Hen House Chicks or on-line).
I have used Minwax Furnish Paste but I do prefer the other one. Here’s my simple an easy knock off version of
chalk paint.
For the painting project you will need:
chalk paint, recipe is below
1 roller with a very smooth nap & paint tray
1 plastic container preferably with measurements printed
on it ( a bldg. supply store sells these)
A disposable plastic cup
Bucket and a small sponge
Sanding sponges, 180 grit and 80 grit.
A small paint brush if you have small detailed areas to paint
Finish wax (this is an important step -do not skip)
If you use Annie Sloan wax, she
has 2 kinds, clear and dark – I mostly use clear. For her wax you will need
mineral spirts too. A small container to
mix them in & a plastic fork to mix the wax and mineral spirits with. I have a special wax brush, but a clean rag or
a waxing sponge work okay too when doing the final wax to the painted furnish
If you use Minwax Finish – I use
it straight out of the can, but like to warm it up a touch for easier
application. So I will use a paper plate and scoop out about 4 Tablespoons and microwave for about 5
seconds. You will need a clean rag, wax brush or wax sponge to apply the wax to
the painted furniture
Chalk Paint Recipe ( this should be enough for a small piece
of furniture) if you run out, just make up another batch.
1 ½ cups of flat latex interior paint
½ cup hot water
½ cup plaster of paris
Directions: Pour 1
½ cups of paint into the plastic container that has the measurement
markings. In the plastic cup add ½ cup
of very hot water, then mix in ½ cup of plaster of paris. Add the plastic of paris into the paint and
mix well. It will be sort of thick.
This is best to do in a garage or shop and you can
complete it in an afternoon or week-end.
On your selected piece of furniture, make sure the surface is clean and
free of dust. I will usually just take
one of those sponges with a scratchy side and do a quick surface clean. That
usually will remove dust, any wax, etc.
Next pour your chalk paint into
the paint tray. A trick I learned was to
wet down your roller with water, squeeze it out. Next begin rolling paint the furniture. Let it dry completely between coats. To
speed things up, you can use a blow dryer to help the paint dry. I usually have to apply 2-4 coats on a piece
of furniture. Depending on the look that
you want.
After applying 2-3 coats and
once the coverage is desirable, let the paint dry to touch. Next fill the
bucket with warm water, dip the 180 grit sanding sponge into the water and lightly sand the entire piece, the paint
should feel smooth. Then I go over the
piece and distress as desired. Wipe down
the area with the regular sponge. Once the look is achieved, then apply the wax
over the piece of furniture. I usually
do 2 coats. Let it dry 3-4 hours before
bringing into the house. The wax needs
to cure about 72 hours before hard use.
~~~
Other items refinished with my homemade Annie Sloan Chalk Paint
 |
| Black Waterfall Buffet (note my trusty and constant guard dog) |
 |
| Farm table |
 |
| Brick red Buffet |
 |
| White Buffet |
 |
| Black buffet |
Girly Up Project #1.... painting a chandelier. I used Annie Sloan chalk paint in old white. No priming needed, just painted it, and applied her "dark wax" to highlight some of the chandelier features.


Girly Up House project #2.... painting my kitchen island with Annie Sloan chalk paint in ebony.
 |
| Before |
Here are the products that I used. Cleaning the cabinets was the 1st step, using the Krud Kutter, then wiping down the cabinets with the denatured alcohol.

Next the side of the cabinets needed a wow factor, so I wall papered the sides with textured Wall paper.
 |
| Textured wall paper applied directly to the cabinet sides |
 |
| This is what is looks like all painted up |
The final product
 |
| Just need to find the right knobs, but it turned out great and I was pleased |
~~~~~~~~~~~~~~~~~~~~~~~~~~~~~~~~~~~~~~~~~~~~~
Girly Up house project #3... making my own Chalk paint and painting a dresser!
Recipe: 1/2 cup hot water, mixed with 1/2 cup plaster of Paris in a new paint can. Next mixing in 1 1/2 cups of flat latex paint. ( I used an old yogurt cup to measure with ). The homemade version was okay to use and I will again make my own for furniture, but when I repaint my kitchen cabinets, I will definately go with the Annie Sloan paint.

Here is the beat up old dresser, it had lots of scratches and had a thin cheap wood veneer
 |

Next I paint the dresser with 2 coats of aqua paint. Let it dry and then with 000 steel wool dipped in hot water, I started distressing the dresser to have some of the black show through.
 |
Before I put the hardware back on, I did "wax" the paint with the real Annie Sloan Clear Wax. You need the wax and an equal amount of mineral spirits mixed together (use an old plastic container) Then brush on and buff. That is it! |
 |
Girly-Up House project #4
A make over for the Hall Tree.... Homemade Yellow and Blue Chalk paint (recipe on Girly up project #3)
 |
| Before, an inexpensive Hall Tree |
It looks good!
ReplyDelete